Monday 22 February 2021

Part 30: Buy Product and Cart Functionality

In this article I will show you how to implement Cart functionality for E-commerce with Buy product action link. Open MobileApplication project and update ProductDetails controller shown below. AllowAnonymous attribute allow action method to accessible by anyone and no authentication required to access it. Basically, I want to allow all users to visit Index page where users can see what all products available for online purchase and Details view to check details of specific product. If user want to purchase anything then User needs to register first.
For Cart functionality I'm using Database tables, combination of session and database table also used . Session I didn't cover here and will show you in later article. Download source code from here
Index view of productDetails visible to all user.
Open details view of ProductDetails controller and update as shown below.
Run application and check browser (Details view)
  Click on Details action view.
Details view not showing product Buy link, to view Buy link login first and come back again to details view.
  After login Details page of ProductController shown below with buy action link.
Add Cart model in model’s folder highlighted below.
  Update MobileDbContext class for newly added model which creates database table after migration.
Open package manager console and run below commands of Add-Migration and Update Database.
  Add cart repository and implement interface members shown below. Click on image to view source code properly.
Add CartProductRepository and implement interface members.
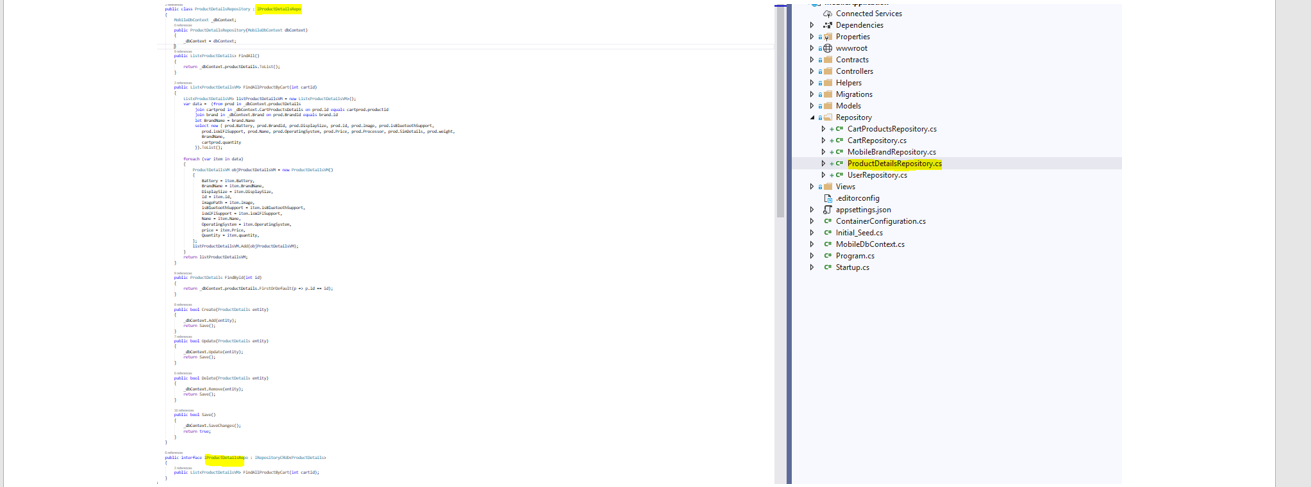
  Update ProductDetails repository shown below, if source code not visible please click on image or check code available on github.
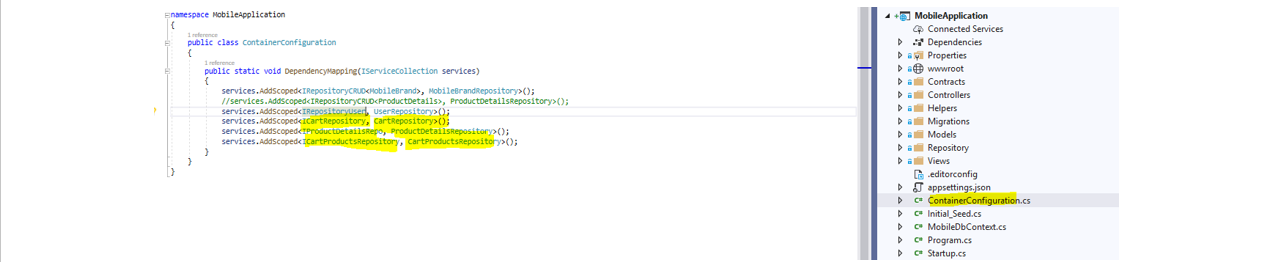
Update ContainerConfiguration class for dependency mappings.
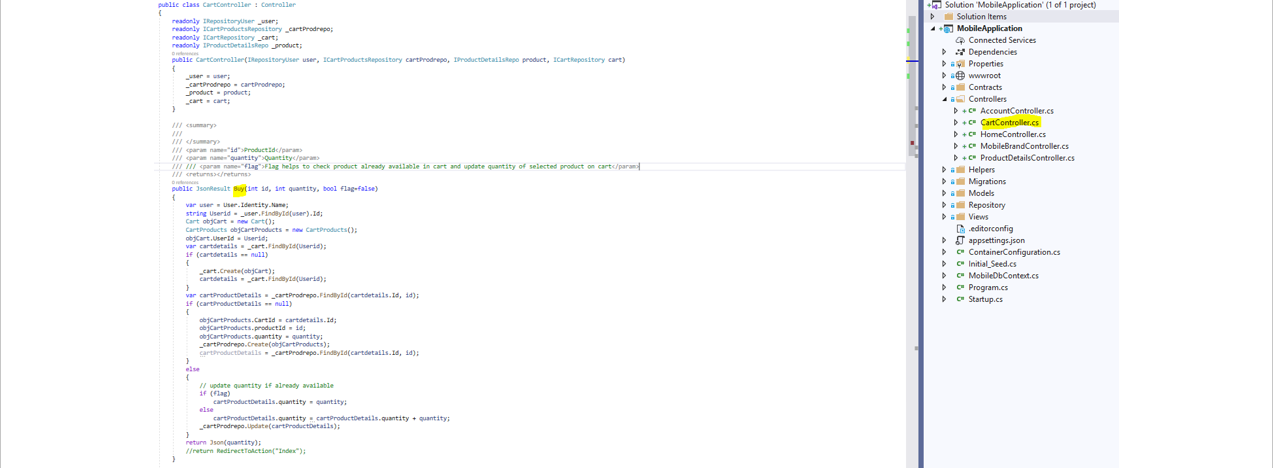
Add cart controller with below action method.
Add below action method in cart controller.
Add Index view for Index action method of Cart controller.
Add empty view for above index method and append below piece of code in Index View.
Add JavaScript function in Index view of Cart controller.
Update Details view of ProductDetails controller. Add JavaScript function for Buy action link in details view shown below.
  Register new User with App user Role. I shown you how to manage roles for new User in previous article.
Login with created user after assigning AppUser role.
On successful login below view from Productdetails controller gets rendered. Click on details View
Click on Cart action link available on header. 8800 is price of 2 items shown in row from below screen.
In next article will work on designing and adding more items to cart with remove functionality.

Tuesday 16 February 2021

Part 2 : Shared Resources in threading

#3 minutes of reading ( if images are not visible properly click on image to open in better quality)
In threading it is important to protect shared resources, will see below what happened if shared resource isn’t protected from concurrent access in multithreaded program. Result, the output or behavior of program can be inconsistent.
Here totalEmployee variable is shared resource.
  The output of program is consistent, now let’s call EmployeeCount method with two different threads shown below.
Run application three or four times and you observe output of program different than it is previous, the reason two thread sharing common resource(totalEmployee). There are several ways to restrict concurrent access while accessing shared resources.

Join Method: Join method wait till current thread finishes execution using Join method concurrent access can be avoided shown below.
Lock Keyword: Lock keyword also used to restrict concurrent access
InterLock: It is also used to restrict concurrent access shown below.

Part 29: Handling Http Errors (404, 500 ..)

#5 minutes of reading

Application return 404 error status when requested resource not found. Example Mobile app which we discussed till now don’t have controller with name Test and if I provide controller name as Test, in this case application return with status 404. Run application and type below highlighted controller name in URL.
There are many ways to handle Http errors, let’s discuss one by one.

Http Errors with Use middleware:
Here will take help of User middleware to handle Http errors and create view to handle errors shown below.
Open Startup.cs file and modify code shown below.
Open Home controller and Add action method shown below. With below piece of code not only 404 but all types of Http Errors can handle.
HttpErrors view added in Home folder under views. I have created simple view to show status later you can update this view based on requirement and information you want to show.
Run application and type Test as controller in URL shown below.
  Asp.Net Core also provides mechanism to handles http errors with the help of middlewares.
1. UseStatusCodePages
2. UseStatusCodePagesWithRedirects
3. UseStatusCodePagesWithReExecute
UseStatusCodePages : This middleware shows basic view with http error 404.
Run application and check browser.
UseStatusCodePagesWithRedirects:
If you want more control over showing Http 404 error on your created custom view, UseStatusCodePagesWithRedirects and UseStatusCodePagesWithReExecute middleware is used. Update below code on Configure method of Startup.sc file.
Add below Action method in Home controller shown below.
Run application and check browser. Initial URL for below scenario is ‘https://localhost:44397/Error/404’ and after redirect URL gets change shown highlighted.
UseStatusCodePagesWithReExecute: This middleware avoids extra redirect performed.
Run application and check browser.

Monday 15 February 2021

Part 1 : Threading in C#

Before starting multi-threading, lets understand multitasking concept.
Multitasking is nothing but performing multiple tasks at same time. CPU handles multiple tasks at a time based of availability of core(CPU). Multiple applications(processes) are running on operating system like VLC media player, word document, browser and so on. For each application there is separate process defined and we can check it on Task manager window. Application (VLC, Browser, Word,…) opened on OS has different process and executed on CPU simultaneously.
Multithreading: Thread is noting but an executable helps to execute application code (piece of code written) to achieve some output like console application. Thread is small process executing piece of code and all applications (console, WPF, …etc) are by default single threaded application. All application comes with Main thread to execute logic written in an application, later for better performance programmer can add many background threads for better performance. Managing multiple threads for an application is nothing multithreading.
A console application in C# uses single thread by default, lets understand with example.
Current thread executing Console application with ManagedThreadId is 1. It means for all applications like console, asp.net Core, WPF application and so on are by default single threaded application.
Later to achieve better application performance you can add more background thread. In below sample I have created separate thread for PrintEvenNumber method which perform printing of even numbers for application
In below section, I have shown you how to call parameterized method using background thread. You can either use ParameterizedThreadStart class constructor to pass method name and instance of ParameterizedThreadStart provided to Thread constructor shown below.
object a = 10;
//Part 1 : Calling parameterized method for background thread
ParameterizedThreadStart param = new ParameterizedThreadStart(PrintEvenNumbers);
Thread t1 = new Thread(param);
t1.Start(a);
  Or normal calling of thread without creating instance of ParameterizedThreadStart and compiler will do it for you in background. //Part 2: Calling parameterized method for background thread
a = 20;
Thread t2 = new Thread(PrintEvenNumbers);// If ParameterizedThreadStart is not mentioned then compiler will do automatically in background
t2.Start(a);
In below example, I have passed input 100 to ‘Thread Even Number 1’ thread and 20 to ‘Thread Even Number 2’. Now I want Thread 2 wait till thread 1 finish execution. But in below screen in command prompt output, Thread Even Number 1 execute partially and control pass to Thread Even Number2 and start executing this thread.
  In real time in some situation, we usually avoid execution of two thread execute simultaneously. To achieve this need to use Join method in C#. Check below screen of command prompt it wait till Thread 1 execute and start execution of Thread 2 after Thread 1 finished.

Saturday 13 February 2021

Part 28: Authorization and Managing Roles in Asp.Net Core 3.1

#10 minutes of reading
In previous article I shown how to Seed default Roles and User into application. In database default roles and admin user is available now.
Open database and check data inside tables shown below. Source Code available on github

Roles created under AspNetRoles table
Application Users created under AspNetUsers table.
User and Role mapping created under AspNetUserRoles.
All above data insertion performed from Seed class created in previous article. Let’s append authorization in application. Open MobileBrands and ProductDetails controller.
Run application and login with Admin user and check browser it rendered Mobile Brands controller.
Create Dealer user with the help of Register view to create new user.
  Login with Dealer user shown below.
Application denied for dealer user while accessing MobileBrand controller, dealer user created but role not yet assigned to dealer user.
  Go to Account controller and implement below piece of code shown below.
Create view for manageUserRole and AddRole action methods.
Run application, login with Admin user shown below. Highlighted ManageUserRole appeared only for Admin user.
Once you click on ManagerUserRole, it will rendered ManageUserRole view, click on AddRole action link highlighted below.
Once you click on AddRole, it will rendered AddRole view. Tick Dealer checkbox highlighted to assign Dealer role for User(Dealer).
Below screen is from database managing roles for Dealer user.