Wednesday 26 May 2021

Part 11 : Token Based Authentication In Web API

In this article I will show you how to authenticate web api using JWT token. JWT stands for Json Web Token. I have created separate blog to explain about what is JWT and how it work please visit the blog from here.
Before proceding this tutorial I will strogly recommend to read previos article to have good understanding on asp.net Core API.
Create asp.net core web api project and create Model class shown below.
Create EmployeeDbContext class and inherit from IdentityDbContext.
Identity is framework from Microsoft which provide default implementation for Authentication and Auhrization with minimal configuration.
Add connection string in appSettings.Json file and open startup file to configure SQL server.
Add-Migration and Update-Database command from package manager console and open SQL server Management studio to check created database with default tables from Identity framework.
Create Account Controller with Login method shown below. For more detail of Token based authentication visit my Token based Authentication blog.
In above screen I have written code in Login method to generate token and this token needs to validate in each incoming Http request. StartUp.cs file is best place to authenticate as code from this class execute for each incoming request. Add code for token validation under configuration service highlighted below.
Open postman and enter URL for Login, provide username and password from body.
Login method returns token generated, this token can be used while accessing authorized data from API. Now Create new controller with below code.
Open Postman and copy Token generated from Login request above. Copy value of Token property and not expiration property.
Select Authorization highlighted below and paste copied token from Login response and click on send. If Token is valid it will return message ‘For Admin Use’ highlighted below.

Sunday 23 May 2021

Part 10 : Consuming API from Console Application

#5 Minutes Of Reading

In this article, I will show you how to consume web API from console application and asp.net core web application in upcoming article. I’m using web API project created in Part 7 of Web API series and code available here.
I have two API method Get and Get with specific Id shown below and consuming below methods in this article.
Create core Console application ConsumingRest_API and create class Users under it with below piece of code.
Above method from class Users under console application is responsible to call Get method of API.
HTTPClient is class from System.Net.Http namespace responsible to call web api method in console application. To call API method HttpClient expect URL of web api hosted on web server, Media type (Accept is a request header value for informing server what format client support) in my case I choose application/json.
Client.GetAsync() method call Get method and I’m reading data in string, you can also get it in complex type which I will show you in later article.
I shown you how to call Get method of API which return list of users from API, let’s see how to call Get method with specific Id.
Above two methods from Users class is ready to consume API methods. Below piece of code call methods from Users and show API response on console.
In upcoming article I will show you how to consume Web API in web application. I will also walk you through how to consume API with Bearer Token in upcoming articles.

Part 9 : Accessing Values From Different Configuration

#5 minutes of reading

In this article I will show you, how you can configure properties like configuring properties in web.config in old asp.net framework. Here in Asp.Net core we don’t have web.config but core support configuring properties from multiple files like AppSetting.Json, Environment variable, User secrete, command line argument and custom file created to store configuration. Will check all different configuration in asp.net core one by one. Let’s start with appsettings.json.
I have created web API project shown below and created Configurationcontroller.
Open appsettings.json file and add config property shown below.
Open ConfigController.cs file and Inject IConfiguration interface which is responsible for reading config properties from different config sources.
For now I’m reading value from appSettings.json later will show you how to read value from User secrete, environment variable and custom file.
For user secret, right click on project-> Manage User Secrets and add config property shown below. User secrets works on development environment.
For environment variable, right click on project -> properties->Debug, shown highlighted in below screen.
Run application and check response.
I have added below highlighted keys in appSettings.json
Implement below Http get method which return list of available config properties under Configuration controller.
In above screen, API return all configuration key available and to get specific key value from API, call get method with key name shown below.
I shown you asp.net core provide variety of different files for configuration. Advantage of this is if you are in development environment you can configure connection string in User secret or environment variable, for staging and propduction connection string(environment variable) should be different.
Core also provide concept of environment based files. You can create appSettings.{Environment}.Json. based on Environment specific appSetting file used for reading configured values.

Saturday 15 May 2021

Part 8 : EF Core in Web API

#5 Minutes Of Reading

In this article I will show you how to implement entity framework and how useful dependancy injetcion, I’m moving to database data from in memory data without affecting controller code. This is the advantage of using DI in application. You will came to know as later in this course. Source code available here 
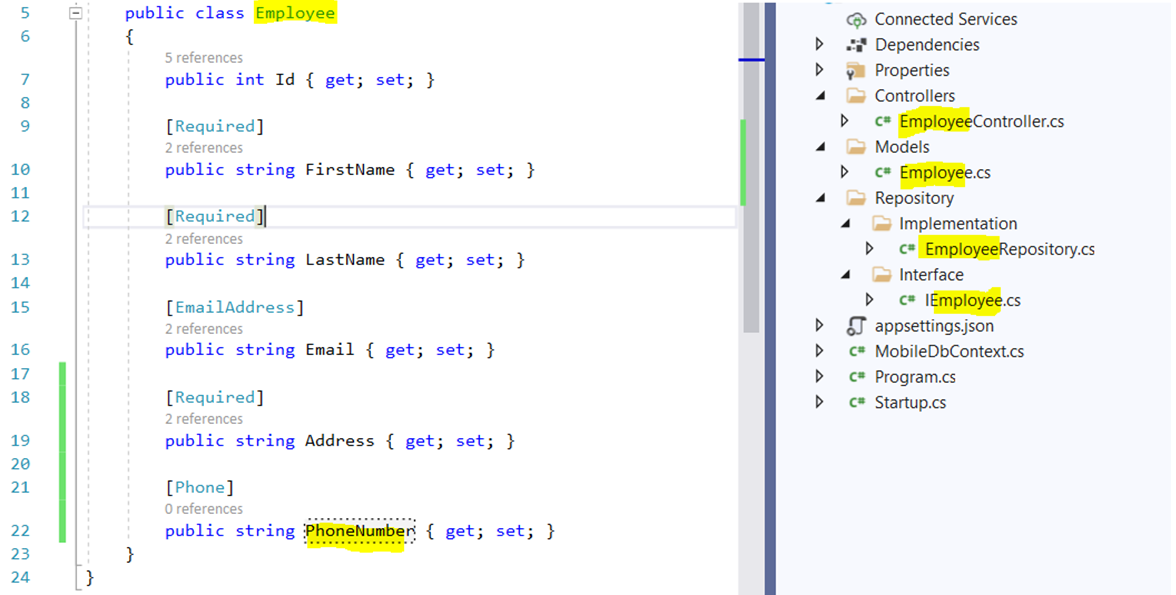
Change model name from User to Employee shown below.
Add class EmployeeDbContext which is resposible add/modify SQL database. Property with type DbSet represent database table as property in c#.
Open appSettings.Json file and add connection string here.
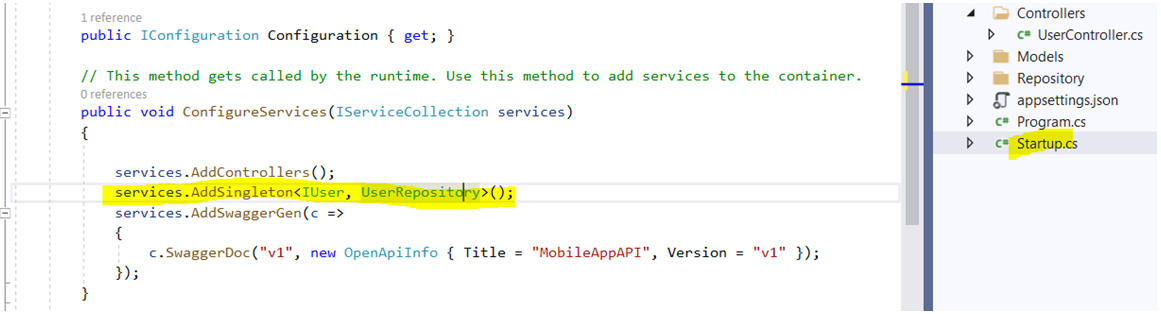
Open Startup.cs file and add below highlighted line of code to configure EF core in ConfigureService method.
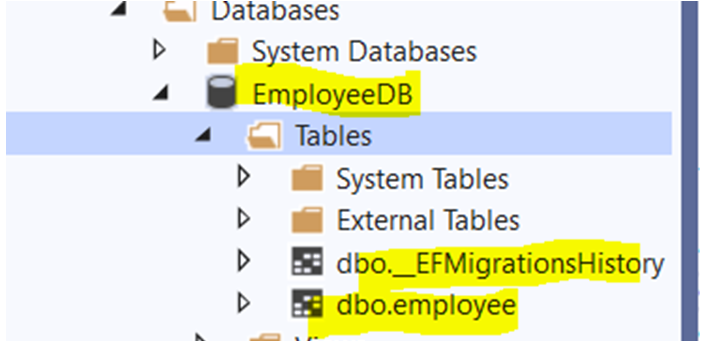
Everything is set up to create database with employee table. From visual studio go to tools -> NugetPackageManager -> PackageManagerConsole
Enter Add-Migration command under package manager console window shown highlighted.
I have commented code for repository ‘EmployeeRepository’ is resposible to read data from in-memory data and EmpRepository is responible for reading data from EF core.
The benefit of using dependancy injection, high level object not change, here in this Employee controller code is same for EmployeeRepository (in-memory) and EmplRepository(Ef Core). Changes done in backend and controller referencing interface which is common for both repository.
Run application and add record for employee in database table using POST method.
Create EmpRepository shown below which inherit same interface which I used for in-memory data.
Update Startup.cs to refer updated repository.
Now this is the power of dependancy injection, commented code with EmployeeRepository is resposible to read data from in-memory data and EmpRepository is responible for reading data from EF core.
The benefit of using dependancy injection, high level object not change, here in this Employee controller code is same for EmployeeRepository (in-memory) and EmplRepository(Ef Core). Changes done in backend and controller referencing interface which is common for both repository.
Run application and add record for employee in database table using POST method.
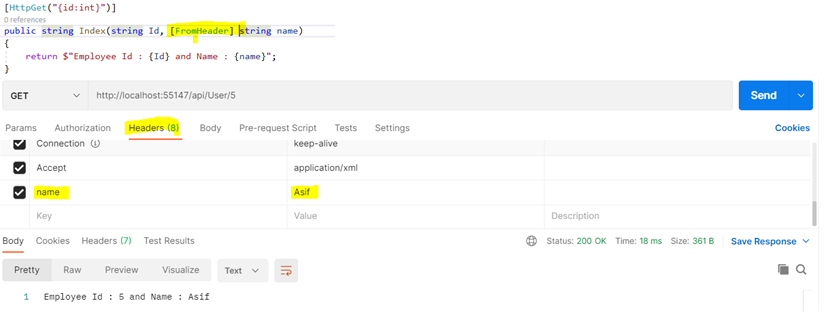
Click on POST button, again click on TryOut button, modify data shown below highlighted and click on execute button.
Data added in database table.
Add few more records for employee and test all remaining Http post methods implemented in Employee controller.

Friday 7 May 2021

Part 7 : Exchanging Data in Web API - 2

# 5 Minutes Of Reading

This is continuation to part 6, in previous article I explained how to pass data from http request using route, query string, request header.
In this article I will show you how to pass data from request body. If you are planning to pass custom type, then request body is used.
Let’s see in action, create Models folder in root directory of project. Under Models folder create User class with few properties shown below.
I'm using in memory data with repository patern, create IUser interface shown below. I will cover repository and dependancy injection in detail in future article, for now just skip repository and dependancy injection or you can visit my dependancy injection article from asp.net core series.
I have created Repository folder and again created two folder inside Repository folder, Interface and Implmentation shown below.
Create UserRepository class under Implementation folder.
Open Startup.cs file and add below highlighted code.
Open UserController and update below code.
Get method of api return all users and Get method with Id parameter return specific user absed on filter, let’s check with postman tool. Below highlighted api/User coming from attribute routing declared at line number 11 above controller name.
Implement Http Post and Put methods, update Iuser and UserRepository class.
Update User controller, add Post and Delete methods.
Run application and check result in postman.
Now delete latest created user with Id 3. I’m passing Id as query string parameter and not route parameter because I didn’t specify Id parameter in HttpDelete attribute.
Now execute Get method to verify record deleted from list of users or not.

Wednesday 5 May 2021

Part 6 : Exchanging data in Web API

#5 Minutes Of Reading

In this article I will show you, how to pass data to Http methods of Web API or return value from an API.
Http Request helps to pass data to API methods and Http response is responsible to get/returned data from API. I will show you in detail later few articles.
There are several ways to pass data with Http request like query string, route parameter, request header and body. Let’s check all this one by one.
Create Web API application.
Select .net 5.0 target framework shown below.
I have created Index http method. This method gets call with URL
http://localhost:port/api/User
Above url formed with the help of attribute routing, Attribute routing is mechanism where developer can specify cutom URL / virtual path which is even not matching with Api controller name.
Like in below screen I used [Route(“api/[controller]”)] above controller name. you can use any name instead api/[controller]. [controller] automatically replace your controller name.
Click on Get button, it will expand panel and then click on ‘Try It Out’.
Click on Execute and check api response below. I wil show you what is swagger later in this course. For now you can consider it helps to test an API response. In below screen you can see message return from API ‘Hello from API’ with response code 200 and response header highlighted below.
I used string as return type for my Get request, but you can use any valid type or custom type. Will show you how to pass parameter to API method. I’m using Postman tool to test API response shown below.
You can also restrict specific data type like allow only integer value for employee/user id and restrict other type or string.
Let’s see how to pass query string parameter to API.
Reading value from API request header shown in below screen. FromHeader attribute is responsible to read value from request header shown below in highlighted.
In next article I will show you how to bind custom type/class as model.