HTML Helpers in MVC (5) Part 1
HTML helpers are library of controls provided by MVC framework. It is similar from asp.net web form controls (Grid, Button, TextBox, … etc). Html helpers gets rendered into plain HTML on browser. Html helpers are lighted weight as compare to Web Form controls, as they don’t support Viewstate.
Helpers are divided into 2 types.
1. Default Helpers (provided by MVC framework)
2. Custom Helpers (create based on your project requirement)
In this article will focus on Default helpers and in Next article will explain Custom helpers.


Right click on controllers folder and create new controller from options with name UserController.

Right click on Index action method of UserController and create Empty view using Add button below.

View gets created in User folder under Views. Below View is not strongly typed View as while creation of View MVC allow to create view with strongly types view or not by selecting model for the View. You can observe in above screen Model Class field is empty which means created view is not strongly typed View.

Above highlighted all are HTML helpers MVC provide for rapid development, we can check in above screen highlighted @Html.Label, @Html.Editor, @Html.DropdownList, ..etc are Html helpers which render plain Html on browser and helps developer to write small amount of code. Basically Helpers are library provided by MVC framework which reduces piece of code for rapid development.
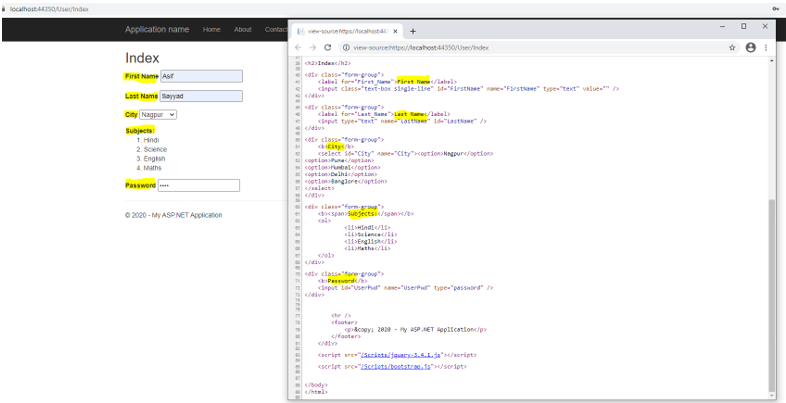
On above screen (https://localhost:44350/User/Index) Right click and select page source. It opens separate window with pure HTML controls, it means all HTML helpers rendered as HTML control on browser. And we can see benefit of using helpers which reduces number of lines and achieve same result on browser.
Till now we discussed normal View, lets discuss strongly typed View and how it helps in rapid development.
Switch back to visual studio and create model class (User.cs) in Models folder.
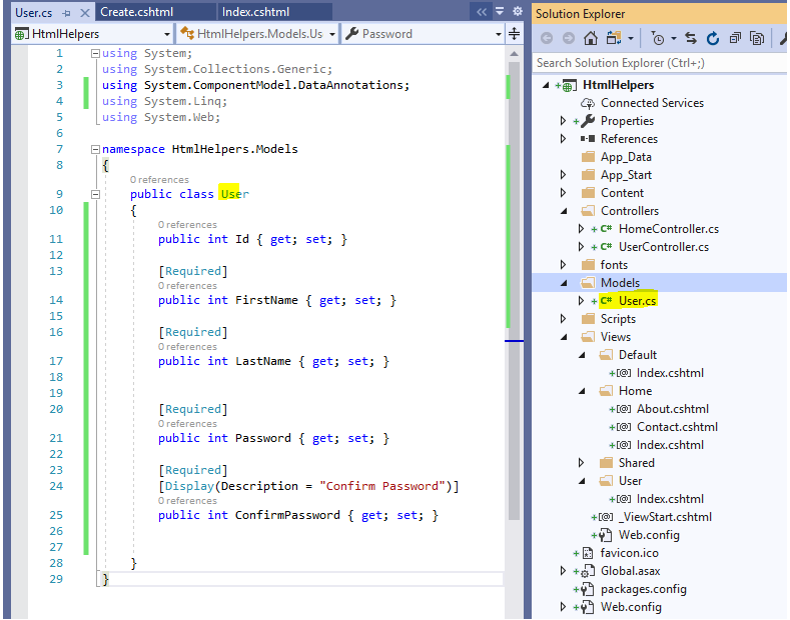
Open UerController.cs file and create action method to read properties of User Model.

Create action method is created in User controller, right click on create action and select Add View , Make sure you build project before creating View otherwise User(HtmlHelpers.Models) highlighted above for Model class won’t appear.
View gets created under Views folder. If you observe code for view created automatically with concept called scaffholding. If you notice first line of the view is clearly mentioned type of view.
@model HtmlHelpers.Models.User : Type of view is User and this view is for creating/inserting data. The view mentioned model(type) for the view called as strongly typed view.

Now you know what normal view is and strongly typed view.

I didn’t write any piece of code for User create view all is generated automatically. Later decided to put space after First and then Name for FirstName Text highlighted above.
Just modifying model we can achieve this, even no need to update create view after this change just modify User.cs file from models folder and run application to see changes.

Click here to visit Part 2 of this article.
posted by Asif Sayyad @ December 26, 2020
0 Comments
![]()


0 Comments:
Post a Comment
Subscribe to Post Comments [Atom]
<< Home